Quantcast
Channel: mvvm – The ZK Blog
Viewing all 11 articles
Browse latest View live

ZK8: New Form Binding Approach

$
0
0

2015/3/16 updated:

Now the proxy object in form binding will auto-detect the changes of proxy object and form status. In this sample, the following code segment can be omitted : BindUtils.postNotifyChange(…);
Introduction

We are glad to disclose the firsthand information on one of the most to die for features in ZK 8 – New Form Binding Approach. It can deeply support these types – Collections, Map, and POJO in a form concept, as a proxy object for developers to manipulate them when users edit data in the form field. Once the form is submitted, all the edited data will be synchronized back to the original data object.

The following class diagram shows the difference of Form Binding implementation between ZK 7 series and ZK 8.0.

Form Class Diagram

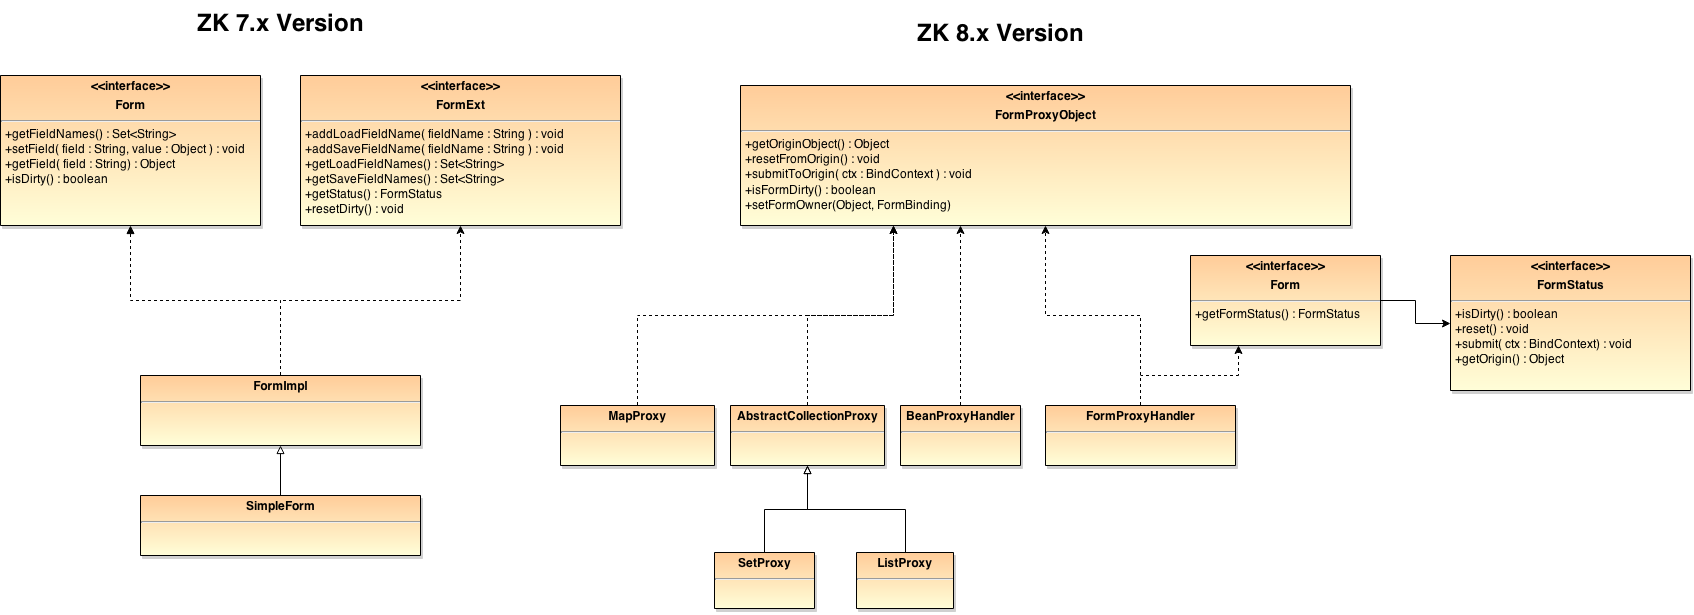
As shown in the diagram above, all user bean instances in the new Form Binding are proxy objects which can be used in the same way as the origin object without having to understand the underlying details of the Form Binding mechanism.

Books Management Demo

Here’s an example to demonstrate the form object (Book) with a collection property (Categories) in which users can edit the field data that belongs to Book or Categories in their own scope for caching.

Get Adobe Flash player

In this demo, only the following 3 classes – BooksViewModel, Book, and Category are used:

ZK8- New Form Binding Approach

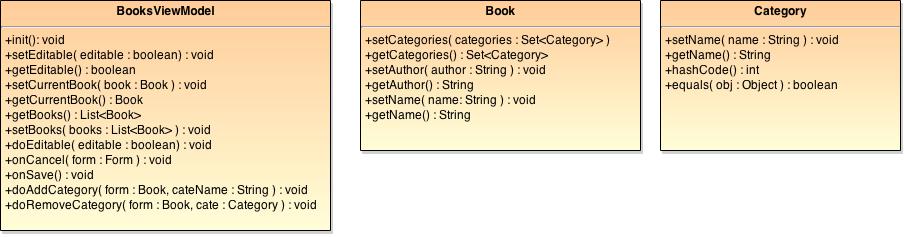
With the new Form Binding, following the Java Proxy contract, the two classes – Book and Category needs to provide an empty constructor for the proxy mechanism to use. As shown in the diagram, in the Category class, we overwrite the hashcode and equals methods of the Category class to make sure only an unique category name exists.

Note: in the methods hashcode and equals, we cannot directly use the instance field to check, because the proxy object can be only handled by the method invocation, not the instance field. For example, use getName() instead of this.name.

In the BooksViewModel class, we provide 5 commands for the View to use.

  • editable: used for detail grid to be editable.
    @SmartNotifyChange("editable")
    @Command("editable")
    public void doEditable(@BindingParam("editable") boolean editable) {
    	this.editable = editable;
    }
    

    The @SmartNotifyChange is added since ZK 8.0, it means that notification is only triggered when the “editable” property has changed. Unlike @NotifyChange which triggers the notification every time.

  • cancel: used to cancel all changes. In fact, when this method is being invoked, it will trigger a NotifyChange for the “currentBook” so that the form object (a proxy Book object and its descendant) will reload the data from the original object to itself.
    @Command("cancel")
    @NotifyChange("currentBook")
    public void onCancel(@BindingParam("form") Form form) {
    	//2015/3/16 updated, this line can be omitted
    	//BindUtils.postNotifyChange(null, null, form.getFormStatus(), ".");
    }
    

    As you can see here, we manually post a NotifyChange for the form status which is used in the zul page to switch the status of the cancel button. The parameter of “form” can be either a Form interface or a Book class, we use it as a Form interface in this case.

  • save: used to save all changes from the form object to the original object and its descendants.
    @Command("save")
    @NotifyChange({"currentBook", "editable"})
    public void onSave() {
    	this.editable = false;
    }
    
  • addCategory: used to insert a new category to the form object.
    @Command("addCategory")
    public void doAddCategory(@BindingParam("form") Book form,
    	@BindingParam("cateName") String cateName) {
    	Set categories = (Set) form.getCategories();
    	categories.add(new Category(cateName));
    	//2015/3/16 updated, the following two lines can be omitted
    	//BindUtils.postNotifyChange(null, null, form, "categories");
    	//BindUtils.postNotifyChange(null, null, ((Form)form).getFormStatus(), ".");
    }
    

    The parameter of “form”, like we mentioned in the “cancel” command, is a proxy object of the “currentBook” instance of the BooksViewModel. The value returned from “form.getCategories()” is also a proxy object of the Set type for the “currentBook” instance.

    As a result we add a new category object that only affects the proxy object (Set type), not the original set in the “currentBook” instance.

  • removeCategory: used to remove a category from the form object.
    @Command("removeCategory")
    public void doRemoveCategory(@BindingParam("form") Book form,
    	@BindingParam("category") Category cate) {
    	Set categories = (Set) form.getCategories();
    	categories.remove(cate);
    	//2015/3/16 updated, the following two lines can be omitted
    	//BindUtils.postNotifyChange(null, null, form, "categories");
    	//BindUtils.postNotifyChange(null, null, ((Form)form).getFormStatus(), ".");
    }
    

    Here the concept of the removing category is the same as the “addCategory” command.

In the zul file, there is nothing different from the past, the only new feature we add in ZK 8 is that we provide a cleanup concept for the form field within the form proxy object.

For example,


... // omitted


As shown above in line 11, the “fx.resetEmptyStringValue” expression is used to clean up the value of the textbox when user clicks the buttons “addCategory” or “cancel”.

If ZK doesn’t provide these built-in methods, developer needs to declare the “getResetEmptyStringValue()” method by themselves in their own POJO object or else they will be initiated as a form proxy object.

ZK 8 provides 9 built-in methods in the form proxy object transparently for developers to clean up the component value as follows.

  • resetEmptyStringValue: returning an empty string value
  • resetNullValue: returning a null value
  • resetByteValue: returning a byte value (0)
  • resetShortValue: returning a short value (0)
  • resetIntValue: returning an int value (0)
  • resetLongValue: returning a long value (0L)
  • resetFloatValue: returning a float value (0.0f)
  • resetDoubleValue: returning a double value (0.0d)
  • resetBooleanValue: returning a boolean value (false)
  • resetCharValue: returning a char value (‘\u0000′)

You may have noticed in line 3 of the example above, we used “@load(1)” to switch the template, this is a trick to make it work within the current ZK version. However, we will introduced another new concept called Shadow Element to do the same thing but in a more clever, powerful, and flexible way in ZK 8.0, we will talk this topic another time, please stay tuned. :D

Download
You can download the whole example from github.


ZK8: More powerful data binding in MVVM – Chilldren binding support ListModel

$
0
0

Introduction

In ZK 8, we enhance the performance of MVVM and had it made more powerful. One of the most important features is the enhancement of children binding. Originally, children binding allows us to bind child components to a collection, in which we can create a group of similar components dynamically upon the collection with <template> where you can easily design a template-based layout.

Now, children binding supports ListModel ! This means you can now separate View and Model by implementing ListModel, which is used to provide data. Also, when you add/update/remove the data in the model, the corresponding components in children binding will be rerendered at the same time. (To know more about ListModel, you can see here.)

DEMO

This DEMO shows the difference between using List and ListModel in children binding.
(When new components are rendered, the color of the border will change.)


<a href=”http://adobe.com/go/getflashplayer”><img alt=”Get Adobe Flash player” src=”http://www.adobe.com/images/shared/download_buttons/get_flash_player.gif” /></a>

When using List in children binding, to update data you have to use @NotifyChange to notify the binder any property changes, and the whole rendered components in children binding will be rerendered at the same time.

index.zul

<vlayout children="@load(vm.list)">
  <template name="children">
  ...
  </template>
</vlayout>

ProductListVM.java

@Command
@NotifyChange("list")
public void add_list() {
  Product newProduct = new Product(++count, "Microwave oven", 999);
  list.add(newProduct);
}

Alternatively, if you use ListModel in children binding, you can simply control the model, and only the corresponding rendering components will be rerendered.

index.zul

<vlayout children="@load(vm.model)">
  <template name="children">
  ...
  </template>
</vlayout>

ProductListVM.java

private ListModelList model = new ListModelList();
...
@Command
public void add_model() {
  Product newProduct = new Product(++count, "Microwave oven", 999);
  model.add(newProduct);
}

(There are some default implementations of ListModel, such as ListModelListListModelMapListModelSet and ListModelArray.)
Instead of rendering the whole children component, using ListModel in children binding is faster and easier to manage data.
Hope you’re all excited about this feature of ZK8 !

Download

The demo code can be found in github.

ZK8: Work with Polymer Components using ZK’s new client side binding API

$
0
0

Introduction

One of the new things you can do in ZK8 is to publish a ZK’s data binding command on a native html element. For example, you can publish a doClick command in your view model with an onClick event in a html Button. By using this cool feature, we can now easily grab some native html elements and make them work with ZK’s data binding.  In the rest of this blog, we will demo how to make a Polymer web component interact with ZK’s data binding. If you are not familiar with Polymer, please checkout their official page.

Demo

This demo displays the temperature variation of New York City by date. User can choose which day they want to check out by selecting the date on the calender.


<a href=”http://adobe.com/go/getflashplayer”><img alt=”Get Adobe Flash player” src=”http://www.adobe.com/images/shared/download_buttons/get_flash_player.gif” /></a>

Implementation

We have three files for this demo, a zul page, a view model and a data model. Our zul page looks like the following:

<zk>
<?link rel="import" href="bower_components/d-calendar/d-calendar.html"?>

<window apply="org.zkoss.bind.BindComposer" 
	viewModel="@id('vm') @init('org.zkoss.demo.DemoViewModel')"
	validationMessages="@id('vmsgs')"
	xmlns:n="native">

       	<n:d-calendar id="cal" class="light-theme" selectedDate="2/22/15" />
       	<charts title="New York City's Daily Temperature Records" 
       			id="chart" type="line" model="@bind(vm.chartModel)" />

       <n:script>
       	zk.afterLoad(function() {
       		jq('#cal').on('d-calendar-date-selected', function(evt) {
       			var selDate = evt.originalEvent.detail.date;

		        zkbind.$('$cal').command('doDateSelected', 
		        	{date: selDate.getDate(), month: selDate.getMonth() + 1,
		        	 year: selDate.getFullYear()});

       		});
       	});
       </n:script>
</window>
</zk>


The calendar we used here is d-calendar, which is a polymer component made by Darek Rossman and the chart we used here is ZK Charts. At line 2, we import the d-calendar html file. At line 11, we bind our chart’s model to the chartModel in our view model. In the script tag, we subscript the date-selected event provided by d-calendar at line 15. Then at line 18, we use ZK8′s new client side data binding API to publish a doDataSelected command back to our view model. In our view model,the doDataSelected method looks like:

	@Command
	@NotifyChange("chartModel")
	public void doDateSelected(@BindingParam("date") String date, 
		@BindingParam("month") String month, @BindingParam("year") String year) {
		String selDate = year + month + date;
		_chartModel = DemoTemperatureDataModel.getModelByDate(selDate);
	}

In this command, we use the received  date to get the corresponding chart model from our data model and update our chart.

To read more about ZK8′s new client side binding API, please refer to here.

Download

The complete implementation of this demo can be found on github.

ZK MVVM Course Special Campaign

$
0
0

MVVM_option6

ZK 8 is on the way with various enhancements on MVVM and databinding. ARE YOU READY?

MVVM is a variant of the Model/View/Controller(MVC) design pattern that helps to achieve a clean separation of your application’s data and logic from its presentation.

MVVM stands for Model, View, and ViewModel. The ViewModel is an abstraction of the View’s state and behavior, making the ViewModel completely independent of the presentation in View so the two can be implemented in parallel and boost productivity.

Adopting the MVVM pattern is now a growing trend for large scale development. But because it is a newer concept, many users experience a difficult transition from MVC to MVVM but fall in love with it once they fully understand how it works.

ZK is the first Java framework to incorporate MVVM as its fundamental development pattern. If you have not experienced how MVVM can accelerate your development efforts, let our experts guide you through the implementation of the MVVM pattern; from the basics to advanced topics in a 6-hour instructor-led Webex course. In addition, a special ZK 8 walk through will be included at the end of the session to help you hit the ground running.

Learn what’s new in ZK 8’s and how these new features could make your dev life easier! :)

Course outline:

  • Introduction
  • Property Binding
  • Command Binding
  • Collection Binding
  • Children Binding
  • Form Binding
  • Validation
  • Converter
  • ViewModel Communication
  • Examples
  • Special Annex – What’s new in ZK 8 walk through

Course options & details:

Class A
Day 1: May 20, CEST 13:00-16:00 (Check your time zone)
Day 2: May 21, CEST 13:00-16:30 (Check your time zone)
Class B
Day 1: May 28, PDT 09:30-12:30 (Check your time zone)
Day 2: May 29, PDT 09:30-13:00 (Check your time zone)

  • Duration: 6 hrs of course plus 0.5 hrs of ZK 8 walkthrough, delivered in two sessions (3 hrs + 3.5 hrs)
  • Fees: $260 USD per participant
  • Tool: Cisco Webex
  • Payment method: Credit card or PayPal account through PayPal

Special Offer:

1. A special annex “What’s New in ZK 8” walkthrough will be included at the end of the session guiding you with the latest innovations about ZK 8.

2. First 5 users who complete ordering MVVM course: Get free eBooks bundle “Mastering ZK Web Applications With Responsive Design” and “Multi page ZK Websites with Responsive Design” written by Top contributor Stephan Gerth along with a ‘websocket realtime admin dashboard module’. Completion order depends on the PayPal transaction time stamp.

3. For all course participants: get a 50% discount coupon for the same eBook Bundle “Mastering ZK Web Applications With Responsive Design” and “Multi page ZK Websites with Responsive Design” written by Stephan Gerth at 56 EUR (against the list price 112 EUR!)

Sign up NOW!

ZK MVVM Course has been completed successfully and the registration is now closed

If you are interested in participating MVVM training or other training courses, please contact us at info@zkoss.org and we will get back in touch for further arrangements.

ZK8: Chat Room with React.js

$
0
0

Introduction

In the upcoming ZK8 release, there are many exciting new features, and among them is client side binding API (client binding for short). With client binding, we can not only trigger commands in the server side, but also register callbacks that may be invoked after executing server side commands. In other words, it is no longer necessary to compose a layout with ZK components in the server side. We now have the flexibility to integrate ZK with other front-end libraries.

For more detail, please look at our former blog post and small talk.

In this post, we will demonstrate how to integrate ZK8 server framework with React.js, a popular front-end library, as layout to build an online chat room.

Version: ZK8-RC

Demo

In this demo, we created a discussion channel for users to interact with each other simultaneously. We see from the video below that there are two windows where two concurrent users leave and receive messages.

Get Adobe Flash player

Implementation

It is quite simple to apply React.js as front-end while ZK as back-end service. We will focus on how to communicate and transfer data between server and client.

Let’s start with one part of our javascript file:

var CommentBox = React.createClass({
  loadCommentsFromServer: function() {
    var self = this;
    //once comments change, 
    //doCommentsChange will be invoked with comments as arguments
    zkbinder.after('doCommentsChange', function (evt) {
        self.setState({data: evt});
    });
    
  },
  handleCommentSubmit: function(comment) {
    var comments = this.state.data;
    comments.push(comment);
    this.setState({data: comments}, function() {
    	//invoke doAddComment to update comments
    	zkbinder.command('doAddComment', comment);
    });
  },
  getInitialState: function() {
    ...
  },
  componentDidMount: function() {
    ...
  },
  render: function() {
    ...
  }
});

It is a simple React component definition, and in line 6, we use ZK client binder to register a callback which will be called (executed) when data changes at server view model.

The process is as follows:

  • data change in server side
  • doCommentsChange is triggered
  • client binder receives the notification and triggers callback

Line 16 is also straightforward, we trigger the command in view model by ZK client binder to update data.

The following is a code snippet in view model:

        
    @Init
	public void init() {
		comments = new LinkedList();
		commentQueue.subscribe(new EventListener() {
			public void onEvent(Event event) throws Exception {
				if ("onAddComment".equals(event.getName())) {
					Map<String, Object> param = new HashMap<String, Object>();
					param.put("comment", event.getData());
					//trigger all instances to update comments
					BindUtils.
                    postGlobalCommand(null, null, "refreshComments", param);
				}
			}
		});
	}
	
	@GlobalCommand
	@NotifyChange("comments")
	public void refreshComments(@BindingParam("comment") Comment comment) {
		//sync comments with other instances
		if (!comments.contains(comment))
			comments.add(comment);
	}
	
	@Command
	@NotifyChange("comments")
	public void doAddComment(@BindingParam("author") String author, 
                                 @BindingParam("text") String text) {
		Comment c = new Comment(author, text);
		comments.add(c);
		commentQueue.publish(new Event("onAddComment", null, c));
	}	


We use ZK Event Queue to achieve real-time interaction. In line 10 and 11, we have to subscribe an event in order to receive it when it is published by line 31, and notify all view model instances to update their own data. That is what line 19 does.

You may notice that there is no method definition of doCommentsChange. Because the only purpose of doCommentsChange is to notify client the data has been changed, we do not need to define corresponding method and we can simply declare some annotations at the top of class level like the following:

@NotifyCommand(value="doCommentsChange", onChange="_vm_.comments")
@ToClientCommand({"doAddComment", "doCommentsChange"})
@ToServerCommand({"doAddComment"})
public class ReactVM {
...

Line 1, once data has changed, trigger doCommentsChange command(which is non-existing method).
Line 2, invoke registered callback in client side after executing the commands.
Line 3, we can trigger server side commands in client side.

Download

The complete implementation of this demo can be found on GitHub.

ZK MVVM Databinding Cheatsheet

$
0
0

While supporting our customers we feel it would be convenient to have a cheatsheet so that everyone can look up the commands easily and avoid being overwhelmed by complicated documentation. This cheatsheet summarizes the basic usage and the purpose of each ZK MVVM binding command, saving you from having to memorize everything by heart.

To retrieve more information, you can always click on the link icon, which will lead you to the corresponding chapter of ZK MVVM Reference.


Download Cheatsheet

Printing Tips: The cheatsheet fits an A3 paper size. If your PDF reader has a “Poster” option in the Print menu, click on “Poster” and select an 88% size. It will then be printed out as two A4 sheets.

ZK 8 Philosophy

$
0
0

ZK8_Philosophy_final


The Rise of Front-End Technology

There is no doubt that the development of client-side technologies has been very active in recent years. It covers various aspects including web specifications like Web Components; CSS frameworks like Bootstrap; Javascript frameworks like AngularJS; and even development tools like Grunt. There are countless examples. In essence, these technologies raise the visual expectations of end-users and bring forward the richness of web applications in both function and design.


The Challenge

Due to this phenomenon, user expectations have significantly grown. We no longer evaluate a web application based on its practicality alone, but we also consider its appearance, responsiveness, animations, and overall experience. As a result, web developers are now starting to rely on front-end technologies more than ever before.

On the other hand, we cannot overlook the crucial role played by the back-end. For example, while there are many impressive Javascript libraries, Javascript code is hard to maintain once it becomes a large application. Moreover, for Enterprise applications, most of the resources are on the server-side, which means the front-end still needs a way to communicate with the server-side. As for security concerns, business logic should be protected at the back-end, as it is considerably more secure than loading sensitive data to the client for processing.

Unfortunately, most technologies fulfill only half of the requirement, meaning they are designed specifically for one side; either the client-side like AngularJS or Bootstrap for delivering a fancy look & feel, or the server-side like the JSF, which focuses primarily on data integration. Either way, you would have to deal with one side completely on your own, as well as the communication between the two sides by yourself. Consequently, in the attempt to minimize losses, developers face a difficult decision in choosing which side.


Combine Existing Rich Front-End Technology with Server-Side

ZK 8 is created to present developers with an ideal solution: combine the strengths of both sides. It aims to leverage the advancing client-side power with client-side command binding and template injection while still allowing  you to enjoy the  equally important server-side integration and security. In short, with ZK 8 you can stay true to your Java roots, but also effortlessly keep up with the ever-evolving world of front-end technologies.

Template injection is done by the introduction of shadow components – a pure server-side reusing mechanism. The shadow components can easily turn HTML pages created by a web designer into a dynamic web page with data binding. Using shadow components is similar to using standard ZK UI components through MVVM approach. By manipulating the shadow components, developers can inject different HTML templates based on the given condition.

Furthermore, with client-side command binding, a Javascript widget can seamlessly communicate with your server-side Java code, as well as extract data from the server. This feature makes it extremely easy to integrate any existing Javascript widgets or libraries in the most beloved Java way.


ZK 8 allows you to reuse the HTML design created by a web designer and any of the hottest Javascript libraries, and control them in pure Java; saving you time, boosting your productivity and WOWing your customers. You no longer need to choose between server-side and client-side; you deserve to enjoy both.


Examples

ZK8: Simple but Powerful; Using Data-handler API to Work with Front-End Technologies

$
0
0

Introduction

Formerly in ZK 8 Philosophy, we focused on the main idea of dealing with front-end technologies. Regarding this concept, we are pleased to introduce a simple but powerful way of working with front-end technologies – the Data-handler API. Through this method, developers can easily define their own data-handler, and use client attribute as additional DOM attributes for creating extra functionalities.

By using Data-handler API, any ZK Components working with Javascript libraries can become modularized and reusable. Developers no longer have to wait for the ZK Team to release a new component, as by combining data-handler with Client-binding, they will be able to incorporate any 3rd party Javascript library efficiently themselves. This ultimate flexibility makes it extremely easy to leverage the evolving front-end technology.

Version: 8.0.0.FL.20150827 and later

Demo

In this demo, we created 11 data-handler samples in different categories.
These samples use different Javascript libraries, such as dhtmlx and Kendo, to work with ZK components like Label, Textbox, Selectbox, and Div.

Implementation

By implementing the Data-handler API, developers will be able to freely integrate 3rd party Javascript libraries with ZK components. For many, the knowledge required to build a component from scratch may be too complex. Hence, in zk.xml, we have created the setting client-config, which simplifies the process considerably, especially since developers are able to directly apply data-handler or package it into an add-on.

Every sample in the following demo contains three parts.

First, we choose a Javascript library and download it.
Afterwards, we set the config file (zk.xml) in our application.

For example, (data-dhtmlxscheduler)

<client-config>
  <data-handler>
    <name>dhtmlxscheduler</name> 
    <link href="~./css/dhtmlxscheduler.css" rel="stylesheet" />
    <script src="~./js/lib/dhtmlxscheduler.js" />
    <script src="~./js/data-dhtmlxscheduler.js" />
  </data-handler>
</client-config>

The name we define in line 3 would correspond with a client attribute "data-dhtmlxscheduler" in ZK component, and the next two lines represent the Javascript library files we want to import.
Moreover, the last <script> tag indicates the data-handler script, which is the third part we need to implement.
To create a great combination between JS library and ZK component, there are a few things we need to consider in the data-handler script.
First, we have to initialize the JS library. It's easy to find a solution on the library's website.
Next, we can handle the transfer of data between client and server (optional).

Example 1: data-markdown

function (wgt, dataValue) {
  var converter = new showdown.Converter();
  //Initial markdown conversion
  wgt.$n().innerHTML = converter.makeHtml(wgt.getValue());
  //Do markdown conversion after value of the wgt has been set
  wgt.setOverride("setValue", function(value) {
    this.$setValue(value);
    this.$n().innerHTML = converter.makeHtml(value);
  });
}

In this example, we override the "setValue" function in ZK widget. Once the value has been changed,
the markdown converter would turn the markdown value into HTML.

Example 2: data-dhtmlxscheduler

function (wgt, dataValue) {
  //Code to init scheduler...
  var self = this;
  if (self.command) {
    scheduler.attachEvent("onEventAdded", function(id, ev){
      self.command("$addServerEvent", {id: ...});
    });
    //other events to server...
  }
//MVVM only
  if (self.after) {
    //addEvent
    self.after('$addClientEvent', function (evt) {
      if (evt != null) {
        for (var i = 0 ; i < evt.length; i++) {
          scheduler.addEvent({
            ...
          });
        }
      }
    });
    //other events from server...
  }
}

In this demo, after initializing dhtmlxscheduler, we can use client binding to handle the communication between client and server. The dhtmlxscheduler library provides some events, such as "onEventAdded", and we can use the method "command" to send the data back.
Also, we can use the "after" method as a listener to detect the changes from server.

Notice that the first parameter (command name) in the two methods would be expanded by adding a prefix "dhtmlxscheduler-" automatically.

Usage

After setting the zk.xml and data-handler script, we can use it in zul file: (data-markdown)

<label xmlns:ca="client/attribute" ca:data-markdown="true" />

If the data-handler has defined the "command" and "after" function, we can use a view model to deal with the transfer of data.

@NotifyCommand(value = "dhtmlxscheduler$addClientEvent", 
  onChange = "_vm_.addEventList")
@ToClientCommand({"dhtmlxscheduler$addClientEvent"})
@ToServerCommand({"dhtmlxscheduler$addServerEvent"})
public class DhtmlxSchedulerVM {
...
}

The annotations of class would build the connection between server and client. (Client binding API.)
@ToServerCommand: Trigger command in server by client.
@ToClientCommand: Trigger the aftercommand in client.
@NotifyCommand: Trigger a command in viewmodel whenever the given expression changes at the server.

Click here to see more details about this sample.

To see more samples, please refer to here.

Download

The complete implementation of this demo can be found on GitHub.

Data-handler is Apach 2.0 License. Contributions are welcome! Show your creativity and share it with our ever-advancing Java community via Github.


ZK: Farewell to 2016 & plans for 2017

$
0
0
zk_2016_christmasnewsletter

We only realize that time flies when we are on the last month of the calendar. While many of us are preparing for the Christmas and New Year vacations already, we would like to take this opportunity to thank you thank you for your support, commitment and all the contribution you have made to the growth of ZK. For example, one of our active contributors, Filip Cossaer, had First Lesson to ZK Framework and a series of online workshop sessions for all users. This year wouldn’t have been so prosperous without your continuous support. 


We’ve introduced ZK 8 in the late 2015, and this year we continued to enhance ZK with a more powerful solution that combines the strengths of both client and server sides, such as Shadow Elements and MVVM. We also assisted many users to upgrade their web applications to ZK 8, some were even from ZK 5 🙂 A Fortune 500 financial company had also upgraded successfully their web application from ZK 6.5 to ZK 8 recently. With this upgrade, they can now leverage ZK 8’s easier responsive design and new MVVM architecture. 


In 2017, we are looking forward to major releases for both ZK and ZK Spreadsheet, which will continue to boost your productivity and improve your experience with us. For ZK, we will follow ZK 8 theme to embrace innovative JavaScript and HTML5 technologies effortlessly. Integration with JavaScript Frameworks such as React and Angular with less effort and more modern look and feel are some of the goals we have in mind. For example, we will introduce Fragment component and a more modern theme is also on its way. 


In addition, ZK Spreadsheet with brand new architecture will also be released next year, and we believe it is going to be the fastest Web spreadsheet on Earth! It will benefit spreadsheet users with huge data as the back-end technology will not be limited to Java.


We would love to hear from you, so if you have any advice and/or suggestions, please do not hesitate to let us know! Stay tuned, more will be coming in 2017 😀

[8.6 Preview] The Navigation Model

$
0
0

In the upcoming ZK 8.6, we have added a new model – NavigationModel. This model is specialized for navigation. The basic idea comes from our previous small talks: ZK8 Wizard Example and Template Examples – Stepbar Navigation. Because these examples were well received, we decided to add this NavigationModel to the package and refined it to be more general.

NavigationModel

The NavigationModel consists at least one level and can be composed to arbitrary levels. The data can be put into the model using a path string. A path string like “Step 2/Step 2-2” can be separated into levels by / symbol. Here is an example on how you can put data into the model:

NavigationModel<String> navModel = new NavigationModel<String>();
navModel.put("Step 1", "step1.zul");
navModel.put("Step 1/Step 1-1", "step1-1.zul");
navModel.put("Step 2", "step2.zul");
navModel.put("Step 2/Step 2-1", "step2-1.zul");
navModel.put("Step 2/Step 2-2", "step2-2.zul");
navModel.put("Step 2/Step 2-2/Step 2-2-1", "step2-2-1.zul");
navModel.put("Step 2/Step 2-2/Step 2-2-2", "step2-2-2.zul");
navModel.put("Step 3", "step3.zul");

Line 1: we can define the data type. Basically you can specify any type you want.

We visualize the structure of this model here for better understanding:

NavigationLevel

The data can be stored in a hierarchical order, so that we can classify data into many levels. You can use <apply> to render the levels easily.

<div viewModel="@id('vm') @init('org.zkoss.zktest.test2.ZK4028VM')">
    <apply level="@load(vm.navModel.root)" 
           templateURI="@load(level.current)"/>
</div>

To handle nested levels, we can use the level property we defined previously to get the current NavigationLevel, and use <apply> to handle child level recursively.

<apply level2="@load(level.child)"
       templateURI="@load(level2.current)" />

Line 1: Use the level to get the current level, and handle the child level here.

Last but not least, we can navigate to any item in the same level using navigateTo API.

<a onClick="@global-command('nav', level=level, id='Step 3')">
   Navigate to Step 3
</a>
@GlobalCommand
public void nav(@BindingParam("level") NavigationLevel level,
                @BindingParam("id") String id) {
	level.navigateTo(id);
}

Demo

Here we built a simple (and fake of course) “Setup Wizard” to demonstrate the functionality and usage of NavigationModel.

A classic setup wizard consists of many phases: Welcome, EULA, Destination, Install modules, Ready to install and Finish. And each phase might consist some steps.

Download

The full demo source can be downloaded from GitHub.

ZK 10 Preview: Introducing ZK Client MVVM Linter

$
0
0

Client MVVM is one of the key features in the upcoming ZK 10, which reduces memory footprint and improves response time by moving data binding from the server side to the client side. While the upgrade from Server MVVM to Client MVVM is usually a straightforward process that requires no modification to existing code, certain Server MVVM usages require some alterations due to the nature of the client side.

To facilitate a smooth transition to Client MVVM, ZK Team has developed ZK Client MVVM Linter — a tool specifically designed for identifying potential compatibility issues in Server MVVM files before upgrading. In this blog post, we will guide you through the entire process of setting up and running the linter, covering everything from basic configuration to advanced customization.

Basic Configuration

To run the linter on your project, follow these steps:

  • Clone the zk-client-mvvm-linter-starter repository from our zkoss-demo page.
  • Open the app.properties file in the root directory of the cloned repository and set the zulDir and javaDir properties to relative paths to your Zul and Java source directories.
  • Open your terminal and execute ./gradlew runLinter in the root directory of the cloned repository. The linter will analyze your project and report potential compatibility issues.
  • Review the reported issues and make decisions best suited for your project, whether that means keeping your existing Server MVVM code or making modifications required for upgrading to Client MVVM.

Sample result from running the linter on F86-ZK-4028.zul and B86-ZK-4211.zul:

INFO: --------------------------------------------------------------------------- 
INFO: Checking /zk/zktest/src/main/webapp/test2/F86-ZK-4028.zul 
INFO: /zk/zktest/src/main/webapp/test2/F86-ZK-4028.zul 
WARNING:  108: 25       Zul files supplied via path binding not checked 
INFO: --------------------------------------------------------------------------- 
INFO: Checking /zk/zktest/src/main/webapp/test2/B86-ZK-4211.zul 
INFO: /zk/zktest/src/main/webapp/test2/B86-ZK-4211.zul 
WARNING:   36: 10       ViewModel without fully-qualified class name not checked 
INFO: ---------------------------------------------------------------------------
  • The linter did not find any incompatibility. However, while the linter covers most scenarios, manual checks might still be necessary for certain cases. Please manually check those Zul or Java files against the lint rules listed in the RULES.md file.

Sample result from running the linter on F00633.zul:

INFO: --------------------------------------------------------------------
INFO: Checking /zk/zktest/src/main/webapp/bind/issue/F00633.zul
INFO: /zk/zktest/src/main/webapp/bind/issue/F00633.zul
WARNING:   22: 22       onClick="..." should be @command
INFO: /zk/zktest/src/main/java/org/zkoss/zktest/bind/issue/F00633.java
WARNING:   69: 13       `@ContextParam(ContextType.BINDER)` not supported
WARNING:   90: 28       `@BindingParam Label` not supported
WARNING:   95: 24       `Object` type casting not supported
WARNING:  105: 26       `@BindingParam Label` not supported
INFO: --------------------------------------------------------------------
  • The linter found an incompatible usage of onClick on line 22 column 22 and four other potential issues in its ViewModel F00633.java file. You can fix these issues before upgrading to Client MVVM or skip upgrading the incompatible ViewModel.
  • For more information on how you can upgrade to Client MVVM, please reference this small talk.

Advanced Customization

Additional properties in the app.properties file:

  • tabSize: By default, the linter assumes a tab size of 4 spaces. If your project uses a different tab size, you can set the tab size to ensure that the reported column numbers match the actual visual positions.
  • jarFiles: If your project relies on external Jar files, providing their absolute paths enables the linter to perform a thorough analysis.
  • disableRules: In cases where certain rules are not applicable to your project, you can selectively disable a subset of the lint rules.

Logging properties in the logger.properties file:

  • handler: By default, the linter uses ConsoleHandler to display output in the terminal. If you prefer to store output in a file, you can switch to FileHandler.
  • java.util.logging.XXX.level: By default, the logging level is set to INFO, which only displays incompatible MVVM files. If you want to see all MVVM files checked by the linter, you can switch to FINE.

To create custom lint rules, follow these steps:

  • Create a new Java class in the org.zkoss.zklinter.impl.rule package that extends the Rule class and override the getDescription method to provide a short description.
  • Override the newZulFileVisitor and/or newJavaFileVisitor method to return a new instance of your custom ZulFileVisitor or JavaFileVisitor.
  • Inside your custom file visitor, override the visit method for the specific node type you want to inspect and use the report method to publish warnings.
  • Add the Java class to the customRules property in the app.properties file for the rule to be integrated into the linter.

Here’s a sample custom rule class:

package org.zkoss.zklinter.impl.rule;

public class MyRule extends Rule {
    @Override
    protected String getDescription() {
        return "My Custom Rule";
    }

    @Override
    public ZulFileVisitor newZulFileVisitor() {
        return new ZulFileVisitor() {
            @Override
            protected void visitElement(Element node) {
                if (/* insert your conditional logic here */) {
                    report(node, getDescription());
                }
            }
        };
    }

    @Override
    public JavaFileVisitor newJavaFileVisitor() {
        return new JavaFileVisitor() {
            @Override
            protected void visitVariable(VariableTree node) {
                if (/* insert your conditional logic here */) {
                    report(node, getDescription());
                }
            }
        };
    }
}

Through identifying potential compatibility issues, ZK Client MVVM Linter enables developers to make upgrade decisions best suited for their projects, whether that means directly upgrading existing code to ZK 10 Server MVVM or making modifications required for upgrading to Client MVVM.

Viewing all 11 articles
Browse latest View live